Sweet + Springy Recycled DIY Topiary
Posted by ADMIN

 {Part of the purpose of Pink Salt Riot is to give women everywhere tools to help them live lives of authentic joy in Christ. And part of how I plan to do that? By sharing amazing and beautiful recycled DIY projects.
Wait, what?
Yes, I know. Not exactly the first thing that pops into your mind, is it? Learn more about why I feel recycled DIY is an important addition to my mission in this post, and get the down low on everything you need to get started right here.}
My husband loves gardening. Five years ago he was more or less indifferent to it, but then he got roped into a side gig as a gardener and found his secondary calling. We bought a house two summers ago and it is on a beautiful little third of an acre in midtown Tulsa. The outside of the house has become his creative domain and the inside has become mine, but that doesn't mean I don't like to
{Part of the purpose of Pink Salt Riot is to give women everywhere tools to help them live lives of authentic joy in Christ. And part of how I plan to do that? By sharing amazing and beautiful recycled DIY projects.
Wait, what?
Yes, I know. Not exactly the first thing that pops into your mind, is it? Learn more about why I feel recycled DIY is an important addition to my mission in this post, and get the down low on everything you need to get started right here.}
My husband loves gardening. Five years ago he was more or less indifferent to it, but then he got roped into a side gig as a gardener and found his secondary calling. We bought a house two summers ago and it is on a beautiful little third of an acre in midtown Tulsa. The outside of the house has become his creative domain and the inside has become mine, but that doesn't mean I don't like to 
Let's get started! Here's what you need to make this DIY topiary:
- Glue gun and glue
- Newspaper
- Tin can (I used a tiny tomato paste can and a bean can for these examples)
- Green paper (I used construction paper. Anything will work that is not too thick.)
- Pencil (doesn't even have to be sharpened!)
- Masking tape
- Scissors and or paper cutter or circle/shaped punch
- Stick (Like from outside. You want it to be fairly thick as it will support the topiary.)
- Paper to cover the can (I used an old sheet music page)
 Step 1: Crumple some newspaper into a ball:
- This will determine the size of your topiary so make it as big or as small as you want the finished product to be.
 Step 2: Secure the ball with masking tape.
- No need to go crazy with tape, one line in 3 intersecting loops around the ball and at the ends of any paper that may be coming away from the ball is plenty.
 Step 3: Stick your stick into your newspaper ball.
- I made sure that one end of my stick was on the pointy side so that it would more easily pierce the ball. Once it was where I wanted it I added a little hot glue to hold it in place.
 Step 4: Cut your green paper.
- I tested 3 shapes for you and I am here to tell you, square is the way to go! Not only is it fastest and easiest to cut (especially if you have a paper cutter!) but it makes the topiary look WAY better in my opinion because the corners give it an earthy, organic look. Circles and the flower shapes made it look too processed and mass produced. I only did part of a topiary with each of these because I really disliked how they looked, but if you are really wanting a really uniform appearance it may be worth the extra time to you to punch out your paper.
- I used approximately 3/4 inch squares. For a much larger topiary I would use larger squares. I also cut about 5 pages into squares and had about 1/3 left over, so judge accordingly for your project.
 Step 5: Shape the paper around the pencil (eraser end if it's sharpened) to make the individual leaves. (See image above)
- There really is no right or wrong way to do this as long as you have a flat surface on the bottom to glue to the newspaper ball.
- It worked well to batch this step. I would do 20-30 leaves this way and then go on to the next step and glue all those, then make another batch of leaves. I felt like it was much faster than switching back and forth from the pencil to the glue gun all the time.

 Step 6: Attach your leaves to the newspaper ball.
- Hot glue is the way to go with this because you don't have to hold it in place for any setting time. Like I said, I would do 20-30 leaves at one time so I could just keep the glue gun in one hand and keep going. I like to put down a short line of hot glue, as much as 4-5 leaves, so I could do them even faster. But don't get too overzealous - sometimes your hot glue will harden too fast for you to get the leaves on if you make the line too long!
- Always start from the leaves already on the ball and work out instead of putting random ones in patches all over. You could accidentally end up with an awkward space that is visible but too small for a leaf in a conspicuous place if you do this. I like to start at the front and work back and down so that if I end up with a space it's not noticeable.

 Step 7: Keep going until you're done!
- It may take a little while, but the results are so worth it and this is an easy process to do while watching your favorite show!
 Step 8: Put the other end of your stick into the can and press newspaper around it to hold it in place.
- I crumped a piece of newspaper around the bottom of the stick before putting it into the can and then used another piece of newspaper to press it in and make sure everything was packed in and secure. Again, I used just a little bit of hot glue around the base to hold everything in place. You can also cover your tin at this point, or wait until the end. I simply cut two pieces of sheet music to fit the can and attached with hot glue. Easy peasy.
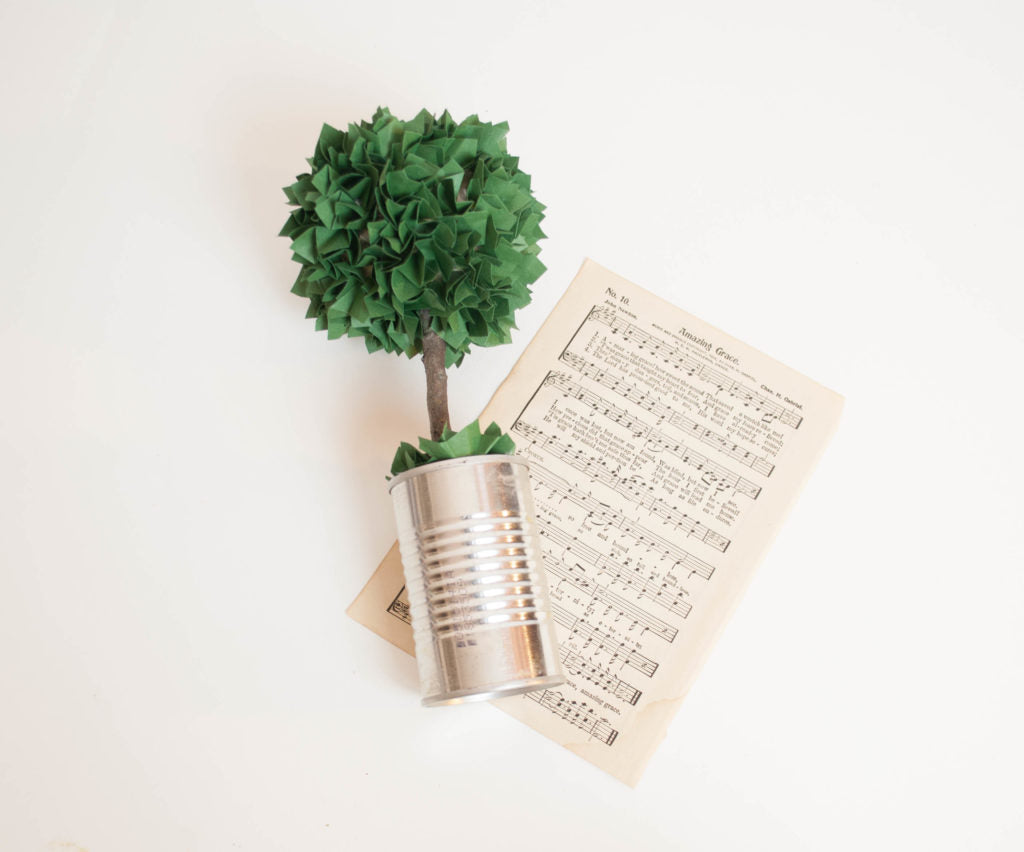 Looks great, doesn't it? And no one would guess they probably have everything they need to make one right in their recycling bin RIGHT NOW! I think I am just going to chip away at making a whole forest of these guys in different heights and shades of green to fill my spring sideboard for years to come!

Are you good at keeping houseplants alive? Do you think you'll make one of these beauties? Share your thoughts and pics in the comments if you make one!
I hope you go forth and make many topiaries that look far more expensive/difficult than they actually are!

